Hodan
A cyanotype portrait story

This story is about a portrait.
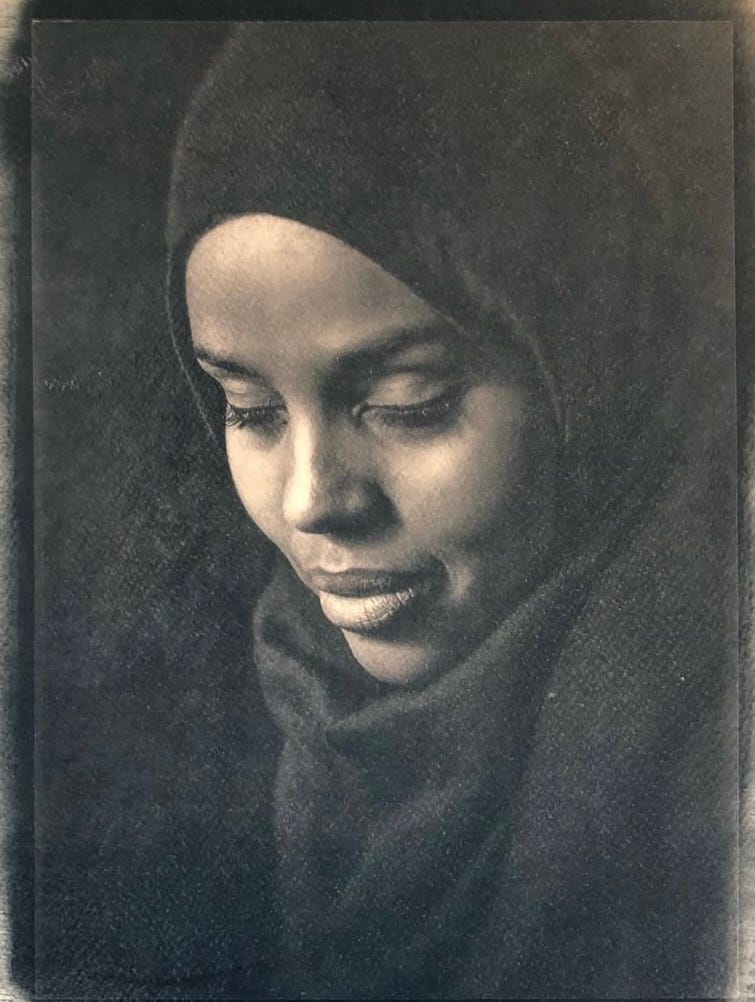
A portrait of a dear friend of mine, Hodan, who, during my early years of settling into the new country that would become my home - the UK, was one of the first (and few) people who kindly allowed me to photograph them. I remain grateful, Hodan!
At that time, I hadn’t yet crossed over into the analogue world; I was still entirely digital, but that wasn’t necessarily a bad thing, as I had the desire and curiosity to explore.
In short, I had a shooting session with Hodan, from which a few beautiful portraits emerged — portraits I still keep with great fondness in my archive.
Years later, when I had begun to unravel the miracle of alternative printing and was just discovering cyanotypes, I rummaged through my archive to emotionally rediscover the images of Hodan, which I considered very well-suited for printing using this method.
For those unfamiliar with the term ‘cyanotype,’ and perhaps interested in the subject, I’ll leave here a short history and a brief description of the process.
A Glimpse into History - The Origins:
The cyanotype process, also known as the blueprint process, was discovered by Sir John Herschel. Among other things, Sir John was an astronomer, trying to find a way of copying his notes. He managed to fix pictures using hyposulfite of soda as early as 1839. Over the years, he improved the process, which came from his discovery of the light sensitivity of iron salts, and officially introduced it in 1842.
A sheet of paper was brushed with iron salt solutions and dried in the dark. The object to be reproduced - a plant specimen, a drawing or a negative - was then placed on the sheet in direct sunlight. After a certain amount of time, depending on the light source, a white impression of the subject formed on a blue background. The paper was then washed in water, where oxidation produced the brilliant blue or cyan, which gave the process its name.
The process was eminently suited to its traditional role in reproducing technical drawings, its most common use in engineering and architecture until the advent of modern photocopiers.
However, it was a versatile process, and was used throughout the 19th century from Anna Atkins’ photograms of plants and seaweed for her books on botany (1843–55) to Henri LeSecq’s still life studies of the 1850s.
Anna Atkins (1799-1871), a botanist, was one of the first people to put the cyanotype process to use, who in October 1843 became the first person to produce and photographically illustrate a book using cyanotypes. She was a pioneering figure in photographic history, producing the first book to use photographic illustrations. Photographers at the end of the century used cyanotype paper for proofing negatives.
The cyanotype process has remained virtually unchanged since its invention, but a few variations have been developed, one of which is the New Cyanotype II by Mr. Mike Ware.
Overview of the Process:
It all stems from the light-sensitive qualities of iron compounds. Ferric ammonium citrate (or more commonly ferric ammonium oxalate) and potassium ferricyanide are combined to become sensitive to UV light.
When exposed to the sun, the ultraviolet rays react with the ferric ammonium citrate or oxalate, which leads to a reduction in the iron compounds, which then react with the ferricyanide to create the deep blue pigment known as Prussian Blue.
As the light-sensitive solution is exposed to the sun, you will see the exposed parts first change from a yellow tone to a green/turquoise colour, gradually changing to a lighter silvery grey/green shade. However, when you ‘develop’ or fix the image by washing with water, you wash away the water-soluble iron compounds, leaving only the Prussian Blue pigment in the exposed areas – reversing light and dark to give you your negative image.
Well, maybe that was a bit long, although honestly, it wasn’t — entire books have been written about this.
Now, what’s interesting is that this process is what’s called a contact print, meaning the resulting image will be exactly the same size as the negative it was printed from.
Up to a point, making a print larger than 8x10 inches (the size of a negative produced directly in an 8x10 view camera) could be quite an adventure, if not almost impossible.
With the development of technology, though, this changed dramatically: a digital image can now be converted into a file that, when printed onto a large transparent film, creates a digital negative as big as the printer allows.
For example, Hodan’s portrait was originally photographed with a Nikon D7000 camera with an APS-C format sensor, at a resolution of 16 megapixels. After being processed and turned into a negative, it was printed on an A3-sized transparency — a spectacularly large negative.
I absolutely love the idea of blending different media and technologies — a 19th-century printing process combined with 21st-century technology, a harmonious balance between the past and present, the organic and the man-made. It's a form of artistry that invites reflection, not just on the image itself, but on the process and intention behind it. In a world dominated by pixels and screens, the creation of a cyanotype (or any other alternative printing method) stands as a testament to the enduring power of hands-on creation and the intimate connection we can forge with the world around us. Just amazing!!!
In the image sequence, you’ll see the steps involved in making this print: first, the negative placed on the paper sensitised with chemicals, then the image after exposure, then after washing/developing, and finally the result — the image in beautiful shades of blue.


Here, however, I played a little, with the intention of toning the print, I used a black tea bath (I prefer black tea or green over other products, due to its nice smell 😉 ), which led to a final image with adorable shades of grey and black.


WOW! This is such a gorgeous portrait! And a great article. Thanks so much for sharing.
What a lovely Post. You did a fantastic job describing the process, as well as the blending of modern tech vs traditional printing methods. Your result is superb. It is a fantastic portrait, and would love to see it full size and in real life. Well done. What size did you end up with after all this? Slightly smaller than A3?